How To Make Char Cloth

We are a reader-supported website so some of our posts may contain affiliate links. Ineedthattoprep.com is a participant of the Amazon Services LLC Associates Program, an affiliate advertising program designed to provide a means for sites to earn advertising fees by advertising and linking to Amazon.com If you buy something through one of those links, you won’t pay a penny more, but we’ll get a small commission, which helps keep the lights on! Thank you for your support!​

Share on facebook
Facebook
Share on twitter
Twitter
Share on pinterest
Pinterest

Last Updated on November 25, 2019 by Lisa Vargas

There are several different options you can choose from when trying to light a fire when you don’t have any matches.  This is a popular topic among survival and prepping communities because if you find yourself in a grid-down scenario without electricity, you may want to keep warm or cook some food by building a fire. 

If you’ve read anything about lighting fires with various types of tinder, you will come across the infamous fire starter called char cloth.   It’s almost guaranteed to get ignite from a spark using flint and steel, for example.  But before you can use it, you have to make it first!  

So today, we are going to dive into how to make char cloth along with how to use it properly.  So let’s dive in!

What Is Char Cloth?

Char cloth is essentially fabric from plant fiber such as cotton, jute, or linen, that is burnt or charred through a method called pyroloysis to produce a slow-burning fuel for starting fires.  According to the illustrious Wikipediadepending on its source material and completeness of char, the char cloth’s autoignition temperature is between 349 °C (660 °F) and 455 °C (851 °F).

What Are The Benefits Of Char Cloth?

There are several benefits of char cloth including the fact that it is extremely reliable as it can ignite with just a single spark from a traditional flint and steel  which can then be used to easily start a tinder bundle on fire.  It’s also known for being windproof, which is important in adverse whether conditions.   Char cloth is better than most of the alternatives out there when starting fires, just make sure you make enough ahead of time.

How To Make Char Cloth

There may be a lot of steps in this process, but it is quite simple and easy to do once you get to the end of it.  Essentially it’s  just a matter of gathering a few materials, finding the right tin, and throwing the tin on the fire.

1. Find A Small Tin

how to make char cloth

The first thing you need to do is find a small, metal tin that is air tight and will close tightly.  This is the tin that you will cook your cloth in.  One of the more popular small tins to use is an Altoids mint tin. 

2. Punch A Hole In The Tin

In the next step, you are going to poke a hole in the top of the tin as well as the bottom. You can easily do this using a hammer and a small nail. By poking the small holes in the tin, it will allow the gases to escape the tin.  It’s also important because when you start cooking the cloth inside of your tin, you will see the smoke escaping from the holes.  And when the smoke stops, you know it’s time to flip over the tin and cook the other side. 

3. Find The Right Cloth

The next thing you need to do is find the fabric you are going to use for your char cloth.  As mentioned above, you will need to use  a material made out of 100% plant fiber such as jute, cotton, or linen.  I use cotton when making my char cloth simply because it’s easily accessible and I can usually find an old 100% cotton t-shirt laying around the house somewhere that I never wear anymore.  

There is also another type of material referred to as “duck cloth.” This works very well as well, and is typically a little thicker than cotton, but it will require you to experiment a little bit more in terms of the cooking time.  Again, I personally use cotton because it’s typically easier to find in a survival situation.

4. Cut The Cloth Into Squares

Next, grab a pair of scissors and cut the cloth into squares that are a little smaller than the size of your Altoids tin.  When you are cutting your squares of cloth, keep in mind that these squares will need to fit loosely inside of the tin. 

5. Lay The Cloth In The Tin

char cloth tin

Gently lay the cut up cloth loosely on top of each other.  Make sure not to try and compact the squares in the tin.  You want the squares to have some breathing room to char properly inside that tin.  If you pack them too tight, the heat won’t reach the inner layers well enough and you’ll have to start over. 

6. Place The Tin Over Heat

making char cloth

Here’s the fun part!  You finally are ready to start cooking your cloth.  Once you have your tin ready with the cloth inside you are going to put the tin on a heat source.  The heat source that works the best comes from the hot coals of a campfire.  You can also start a fire in your fire place and use the coals from the wood, in a wood stove, on a stove top,  or a camping stove.

The key thing to remember is don’t put the tin directly on an open flame fire because if it gets too hot inside the tin, it can light the fabric on fire, then you have to start all over.

7. Let The Tin Cook

The next part is very important.  Once you put your tin on the hot coals you should start seeing white smoke coming from the top.  Wait until the hole in the top has stopped producing smoke and then turn the tin over and let the bottom cook.  Again, you will see white smoke and when the smoke stops, then you pool it off of the fire.  

8. Let Tin Cool

how to make char cloth

Once you think the cloth has been cooked enough, go ahead and pull it off of the fire.  Make sure you let the tin cool completely before opening it because one of the biggest mistakes rookies make is opening the tin can when it’s still hot and the oxygen rushes in and then lights the cloth on fire and you have to start all over again!

Just be careful when you are pulling it off the fire.  Keep the container as air-tight as possible until it cools.  If you’re in a place that has some dirt, you can even bury the tin in the dirt to keep the air out until it cools. 

9. Inspect The Char Cloth

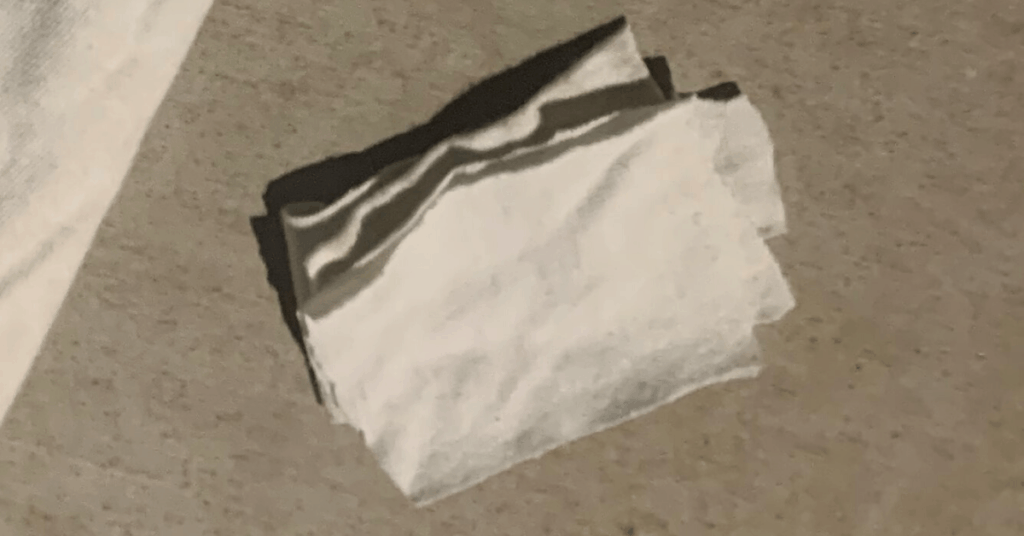
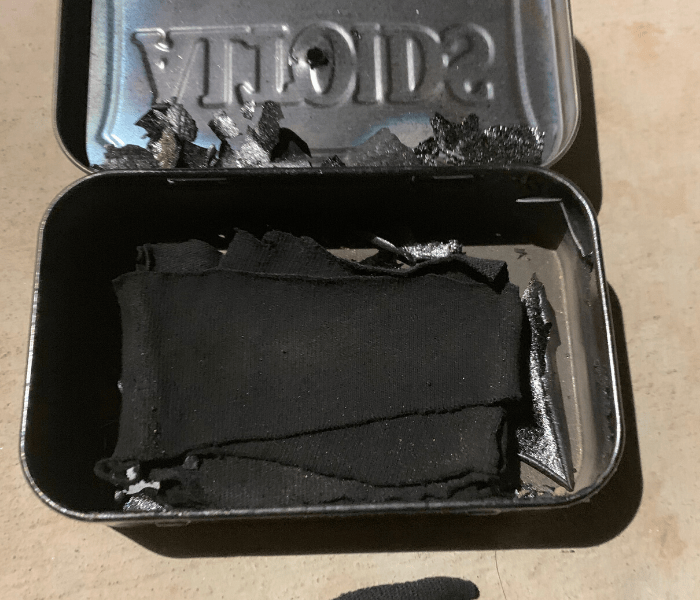
Once the tin has cooled, it’s time to inspect your final product!  Go ahead and open the tin and see what the cloth looks like.  The color should be completely black and it should be flexible enough to still bend a little in your hand without crumbling.  

If it crumbles and turns to ash, you’ve cooked it too much.   In this batch I made, I actually burnt the very top piece (you can see it crumbled to the touch) but the rest were perfect.  If you burn the entire contents inside, you’ll have to start over from scratch.  

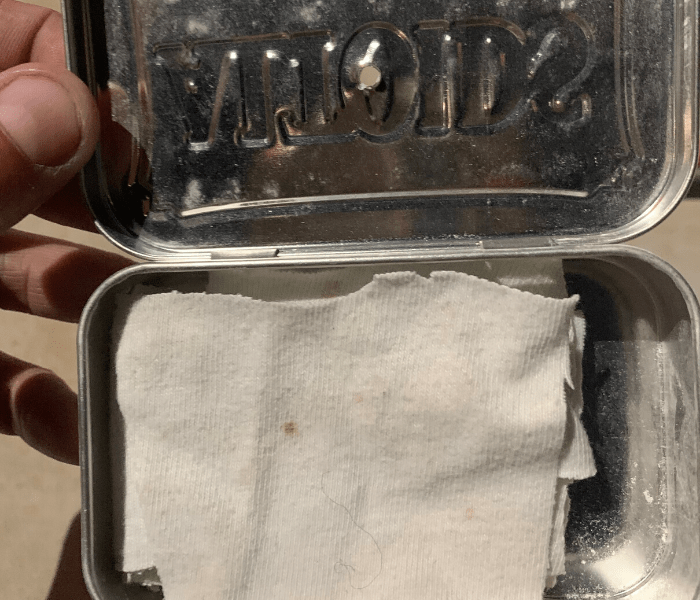
If the char cloth still has the fabric color to it, you haven’t cooked it enough and you’ll need to throw it back in the fire and repeat the process.  Before you throw it back on the fire, rearrange the cloth so that the undercooked pieces are on the outside.

Storing Char Cloth

The key to storing char cloth is to keep the moisture out.  You can buy a new Altoids tin to keep your char cloth in if you want, or use the old tin that you already used.   

If you use the same tin you used to make the char cloth, make sure to encase it with a plastic bag or water-tight container because the tin you originally used has holes in it.  You can also store your flint and steel firestarter kit in the same bag and you’ll be all set.  Throw that all in a bug out bag and you’ll be able to start a fire anywhere you go! 

Final Thoughts

Making char cloth can be a fun, family activity and a great skill to learn how to do.  It’s actually quite easy to do, and you’ll get better and better at it the more you do it.  As you can tell, I still need some practice because I burnt the top piece!  

I hope this tutorial helped. Leave me any comments below or questions.